- Photography: Timer Remote Control - Version 2 back
-
- Introduction
- As
a lucky owner of a Canon EOS 350d DSLR, which has by the way good
astronomical imaging capabilities, I wanted to expand the 350d's
functions with at least those features (This will also work for EOS 400d):
- - Measured exposures longer than 30s
- Time-Laps mode for lime-laps movies
- Exposure Latitude for generating DRI-Images (Dynamic Increased Range Images)
O.K. In that case I could have bought Canon's Timer TC-80
N with an adapter cable, but this is too expensive for me and I wanted to
do something based on my ideas. The 2.5mm stereo jack connector
for external shutter control makes it easy to ad additional equippment.
Anyway, I've searched for similar ideas and found a timer application based on ATMELS AVR Butterfly done by Michael Posavec (http://www.albireo.at/astrohardware/timer/). Thankfully his work is open source, so I decided to modify his
firmware with my ideas. He is also explaining very well how to use and modify
ATMEL's AVR Butterfly and how to programm it. Thank's for your good
job, Michael.
Functionality
All functionalities of the timer remote controlin detail, including my applied ideas:
- intuitive user-interface (You can change each digit individually. The digit to be changed is blinking)
- time laps mode for time laps movies
- long exposure images (astronomy)
- exposure time from 1s to 99:99s
- wait time between images from 0s to 99:99s
- number of images selectable from 1 to 9999 images
- exposure latitude from 1/1000s to 30s, selectable by start and stop value
- easy navigation with a joystick
- timer firmware is open source and can be modified
- background light with different modes.
Known limitations:
- the mentioned limits from above
-
minimum shutter speed for exposure latitude is limited to approx. 1s
due to the remote connector interface (low pass filter) of the camera.
- background light of the display is not so good, but sufficient
- limited instruction guide
- limited support (because it's not comercial)
- the memory space from the AVR Butterfly is quite full (approx. 90% of memory including bootloader)
Firmware
Folowing firmware for the timer are open source. Selling and/or reselling is prohibided.
This Code has been written with AVR Studio from ATMEL 4.12 SP2. For the AVR Studio the gnu gcc compiler is needed. The compiler is part of winavr: http://winavr.sourceforge.net/
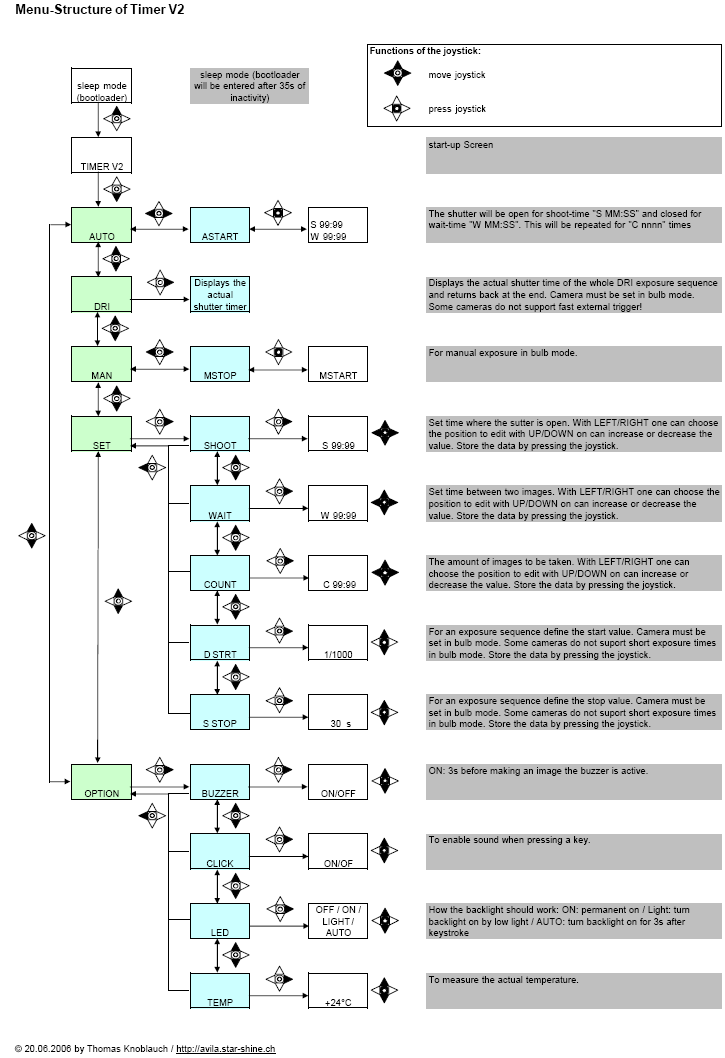
Instruction and Navigation-structure
This
is the Instruction and Menu of the newest Version. Due to freeware I
cannot give more support and won't teach how to take images in detail.
I belive the reader has some basic knwoledges of imaging. Also
available as PDF: menu timer2.pdf

Schematics & How to rebuild it
AVR Butterfly:

The AVR Butterfly is equipped with an ATMEGA 169 uC, some hardware and
a LCDisplay. The Butterfly is operated with a small jostick.
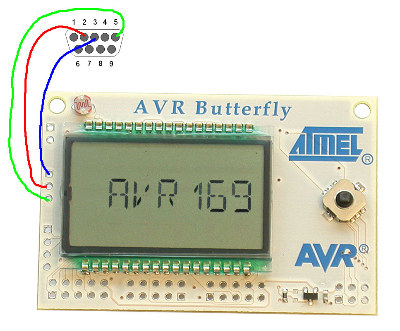
Serial Programming Cable for UART
With this serial cable it's possible to reprogramm the Butterfly by using the bootloader.

Connection Backlight and Remote Connector:
Here you see how the 2.5mm stereo jack connector for Canon EOS 350d and the LED's are applied to the demoboard:

How to upload new firmware:
Step1: build a serial programming cable, use a 9-pin Sub-D plug
(must fit into the serial port COM1 of your PC) and 3 wires to make a
connection according to the picture above.
Step2: download and install the latest AVR Studio from ATMEL (at the time this instruction was written this is AVR Studio 4.12.
Step3:
connect the serial cable with your PC and set the processor of the AVR
Butterfly to the bootloader mode (either by choosing the "Options ->
Bootloader -> Jump to Bootloader" menu item with the joystick of the
board, or just take out the battery at the back of the board and plug
it in again).
Step4: Download the new firmware from above and unzip the file to your local harddrive.
Step5:
Start AVR Studio, press the joystick on the AVR Butterfly and keep it
pressed, select "AVR Prog..." in the Tools menu of AVR Studio. Select
the "Timer.hex" file in the "default" directory of the unziped archive
with the Browse button. Hit the "Program" button below the "Flash"
capital. Wait till "Erasing, Programming and Verifying" has been
executed automatically and hit the "Exit" Button afterwards.
There is NO
WAY you can do anything wrong. Even if you plug out the serial cable
during programming, the bootloader will still remain in the AVR
Butterfly and you can start all over again and reprogram the new
firmware. You can always access the bootloader by removing the battery
and inserting it again, then proceed with step 5.
After
successful completion of these steps your new timer-remote-control is
ready to use. Now you can desolder the serial cable, you won't need it
anymore (unless you want to make some modifications in the firmware).
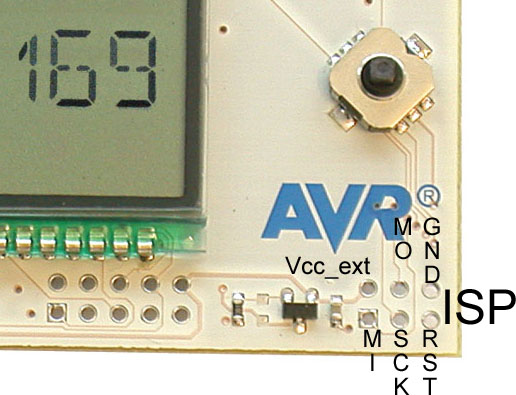
ISP Programming
If the
bootloader messes up, unfortunately I had this situation, I could reprogramm with a ISP cable (Type DT-006) and the Software PonyProg.
I took the original firmware form the Butterfly demoboard including
bootloader and wrote that version back. The original Butterfly Firmware
can be found on ATMEL's Homepage.
Schematics of a DT-006 Cable, that is doing the connection between LPT Port and the ISP port.

The needet resistors have each a value of 100-220 Ohms.

Description which Pin of the ISP corresponds with the DT-006 adaptor.
Image
Now
the Eval Kit is mounted in a box. A little stub has been glued on the
joystick for better handling. Small windows has been made for reading
the display and for the light detector. Well: no price for design, but
functionality is what counts!

Links
Timer application from Michael Posavec http://www.albireo.at/astrohardware/timer/
This firmware is based on the avr-gcc port from Martin Thomas (thank's for your permission): http://www.siwawi.arubi.uni-kl.de/avr_projects/
More information to the Demoboard AVR Butterfly and it's timer application: http://www.atmel.com/dyn/products/tools_card.asp?tool_id=3146
Pony Prog. Programming software for different uP and uC: http://www.lancos.com/prog.html
- This instruction is made like it is. Rebuild is done at your risk! The Autor does not take over any responsability!
07.12.2006 / http://www.star-shine.ch
/ (c) by Thomas Knoblauch / Kontakt &
Copyright


